Bare-root perennials are mature plants grown in open ground, then dug up and shipped without soil around their roots during their dormant season—typically late fall through early spring21. This method is cost-effective, reduces shipping weight, and often leads to healthier, more robust plants once established. Common bare-root perennials include daylilies, hostas, astilbe, echinacea, and many more.
-
: Young roots are shielded from pests, weeds, and harsh weather, allowing for better establishment12.
-
: You can move pots to optimize light, temperature, and moisture.
-
: It’s easier to monitor watering and root development in containers.
-
: Once established, perennials can be transplanted to the garden or enjoyed in pots.
The best time to plant bare-root perennials is during their dormant season—typically from late winter to early spring, before new growth begins21. If you receive plants during a cold snap or aren’t ready to plant outdoors, potting them up allows you to keep them protected and get them growing until conditions are right for planting out23.
-
Bare-root perennial plants
-
Bucket or tub for soaking
-
Clean, sharp scissors or pruners
-
Pots with drainage holes (6-inch or 1-gallon size is typical, but larger roots may need bigger pots)35
-
Optional: worm castings, compost, or slow-release organic fertilizer53
-
Watering can
-
Plant labels
1.
-
Open your package as soon as it arrives.
-
Check roots for damage. Trim off any broken or mushy roots with clean scissors53.
-
Don’t worry if roots look dry—this is normal for dormant bare-root plants.
2.
-
Soak the bare roots in a bucket of clean, lukewarm water for 1 to 6 hours (check the plant’s instructions; most benefit from at least 1 hour, some up to 3–6 hours)157.
-
Optional: Add a splash of liquid kelp or diluted seaweed solution to the water for an extra nutrient boost5.
: If you’re unable to pot up your bare roots immediately, keep the roots sprayed with water or wrapped in damp newspaper to prevent drying out3.
3.
-
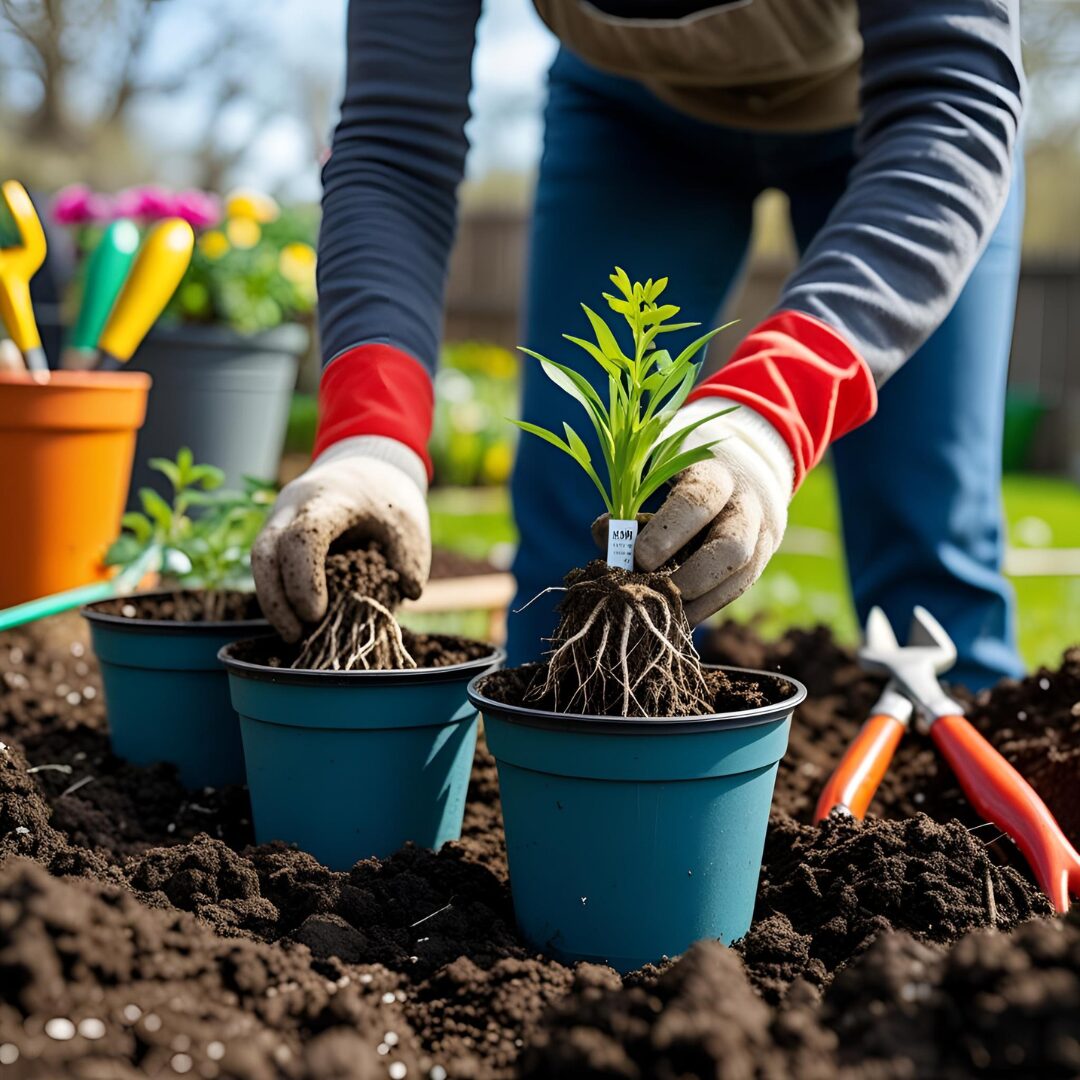
Choose a pot that’s large enough to comfortably spread out the roots without crowding. For larger perennials, use a 2L or larger pot35.
-
Ensure pots have drainage holes.
-
Fill the pot halfway with high-quality potting mix. You can mix in compost, worm castings, or a slow-release fertilizer if desired53.
-
Tap the pot gently to settle the compost and eliminate large air pockets.
4.
-
: The crown is where the roots meet the stem or where new shoots emerge. This should be at or just below the soil surface for most perennials51.
-
: Fan out the roots over the soil. If roots are very long, trim them slightly so they fit without bending upward35.
-
For some perennials (like those with a single thick root), lay the root horizontally and cover with 1–2 cm of soil1.
-
Hold the plant in place with one hand.
5.
-
Fill in around the roots with more potting mix, gently firming as you go to remove air pockets51.
-
Ensure the crown is at the correct depth—generally at or just below the soil surface. Avoid burying the crown too deep, as this can cause rot51.
-
For some varieties, the crown may need to be slightly above the soil line—always check plant-specific instructions.
6.
-
Add more soil if needed after watering, as the mix may settle further.
-
Ensure excess water drains away freely.
7.
-
Label each pot with the plant name and date3.
-
Place pots in a sheltered, frost-free area with indirect light—such as a cold frame, unheated greenhouse, or a shaded spot outdoors protected from extreme cold12.
-
Avoid direct, harsh sunlight until new growth emerges.
-
: Keep the compost evenly moist but not soggy. Avoid letting pots dry out completely3.
-
: As temperatures warm, new shoots will emerge. This may take several weeks depending on the species and weather2.
-
: Once active growth appears, you can top-dress with a balanced, slow-release fertilizer if you haven’t already amended the soil5.
-
: If you plan to transplant your perennials outdoors, gradually acclimate them to outdoor conditions over 1–2 weeks in spring. Move pots outside for a few hours each day, increasing exposure to sunlight and wind gradually2.
-
: If the ground is frozen or conditions are poor, keep your perennials in pots until it’s safe to transplant2.
-
: Too small, and roots will be crowded; too large, and excess soil may stay wet, risking rot35.
-
: A rich, well-draining, peat-free mix gives roots the best start15.
-
: Soggy soil can cause roots to rot before they establish3.
-
: Some perennials prefer crowns just below the surface, while others need to be slightly above51.
| Perennial | Crown Depth | Pot Size | Notes |
|---|---|---|---|
| Daylily | At/just below soil surface | 1–2L or larger | Spread roots out; trim if necessary |
| Hosta | At/just below soil surface | 2L or larger | Keep moist; shade-loving |
| Echinacea | At/just above soil surface | 1–2L | Sun-loving; don’t bury crown |
| Astilbe | ¼–½” above soil surface | 1–2L | Likes moisture; shade or part shade |
| Black-eyed Susan | At soil surface | 1–2L | Easy to grow; sun or part sun |
Yes, many perennials thrive in containers for years, provided the pot is large enough and you refresh the soil and divide plants as needed. Choose varieties suited to container life and monitor water and fertilizer needs closely.
This is normal—white shoots are new growth that hasn’t seen sunlight. Pot the plant as usual; the shoots will green up quickly once exposed to light.
Plant as soon as possible. If you must delay, keep roots cool and moist (wrapped in damp newspaper in a plastic bag, in the fridge) for up to a week. Never let roots dry out completely3.
It’s best to wait until you see new growth before applying fertilizer, unless you’ve amended the potting mix with slow-release nutrients53.
Conclusion
Planting bare-root perennials in pots is a straightforward process that pays off with healthy, vigorous plants and beautiful blooms. By soaking roots, using quality compost, planting at the correct depth, and providing attentive aftercare, you’ll give your perennials the best possible start—whether you plan to transplant them later or grow them in containers for seasons to come. With these expert-backed steps, your garden will flourish with the color and vitality of thriving perennials.
:
1 Farmer Gracy
2 BBC Gardeners’ World
3 Heirloom Soul Florals
4 American Meadows
5 Garden Betty
7 Gardening Express
Citations:
- https://www.farmergracy.co.uk/blogs/planting-care/bare-root-perennials-planting-instructions
- https://www.gardenersworld.com/how-to/grow-plants/how-to-pot-up-bare-root-perennials/
- https://www.heirloomsoul.com/blog/what-to-do-with-bare-root-perennials
- https://www.americanmeadows.com/content/planting-perennials
- https://gardenbetty.com/plant-bare-root-perennials-pots/
- https://menagerieflower.com/blogs/growing-wonder/step-by-step-guide-how-to-plant-bare-root-roses-in-pots
- https://help.gardeningexpress.co.uk/knowledge-base/growing-plants-from-bare-root-a-thrifty-gardeners-guide/
- https://www.devroomen.ca/files/files/bare-root-perenial-growing-info-2017-1-654c8ce1026d4.pdf
- https://www.youtube.com/watch?v=chwk3mVKqh0


